Creating professional exploded view diagrams has traditionally required expensive CAD software and specialized technical expertise. But with Nano Banana (Google’s Gemini 2.5 Flash Image model), you can now generate detailed, engineering-quality exploded diagrams in seconds using simple text prompts. This comprehensive guide shows you how to leverage this powerful AI tool to create technical documentation, assembly guides, and presentation-ready visualizations.
Read Also: Emad Mostaque: The “Secret Agent” Who Lost His AI Empire
What is Nano Banana?
Nano Banana is Google’s state-of-the-art AI image generation and editing model, officially known as Gemini 2.5 Flash Image. This advanced tool combines natural language processing with sophisticated image generation capabilities, making it possible to create complex technical visualizations without traditional CAD software.
The model excels at understanding product structure and automatically generating realistic component separation with cinematic lighting and perfect alignment. Whether you’re working in engineering, product design, marketing, or education, Nano Banana democratizes access to professional-grade technical illustration.
Why Use Nano Banana for Exploded Diagrams?
Traditional methods of creating exploded views come with significant challenges. CAD software requires extensive training, manual component separation is time-consuming, and professional rendering software can cost thousands of dollars. Nano Banana eliminates these barriers while delivering results that rival traditional methods.
The advantages are compelling. You can generate professional exploded views in 30 to 45 seconds compared to hours with traditional CAD tools. The AI automatically understands product structure and creates realistic floating effects without manual positioning. There’s no need for expensive software licenses or technical CAD expertise. Most importantly, you can iterate rapidly by adjusting prompts to refine your results instantly.
Getting Started: Access Options
You can access Nano Banana through several platforms, each suited to different needs. For beginners, Google AI Studio offers a free, no-code interface ideal for quick projects and experimentation. The Gemini app provides direct chat-based access with image generation capabilities built in. For developers, the Gemini API enables programmatic access for automation and integration into workflows. Enterprise users can leverage Vertex AI for production-level implementations with enhanced security and scalability.
To get started with the free option, navigate to Google AI Studio, sign in with your Google account, select the Gemini 2.5 Flash Image model, and you’re ready to begin creating.
Essential Components of Exploded Diagram Prompts
Crafting effective prompts is crucial for generating high-quality exploded diagrams. Your prompt should include several key elements to ensure optimal results.
Begin with the product description. Be specific about what you’re visualizing, such as “wireless Bluetooth headphones,” “mechanical watch movement,” or “smartphone internal components.”
Specify the view style as an exploded view with floating components. Request component separation by indicating that parts should be “floating in mid-air” or “staggered with clear spacing between layers.”
Include lighting instructions. Cinematic or soft volumetric lighting creates professional-looking results. Specify material characteristics like “polished metal,” “brushed aluminum,” or “transparent glass components.”
Request alignment and spacing details. Ask for “perfect alignment,” “vertical axis arrangement,” or “radial explosion pattern.” Finally, specify your desired resolution, typically 4K or 8K for professional use.
Read Also: 10 Best Free AI Apps You Should Have on Your Mobile Phone in 2025
The Master Prompt Template
Here’s a proven prompt template for engineering-quality exploded diagrams:
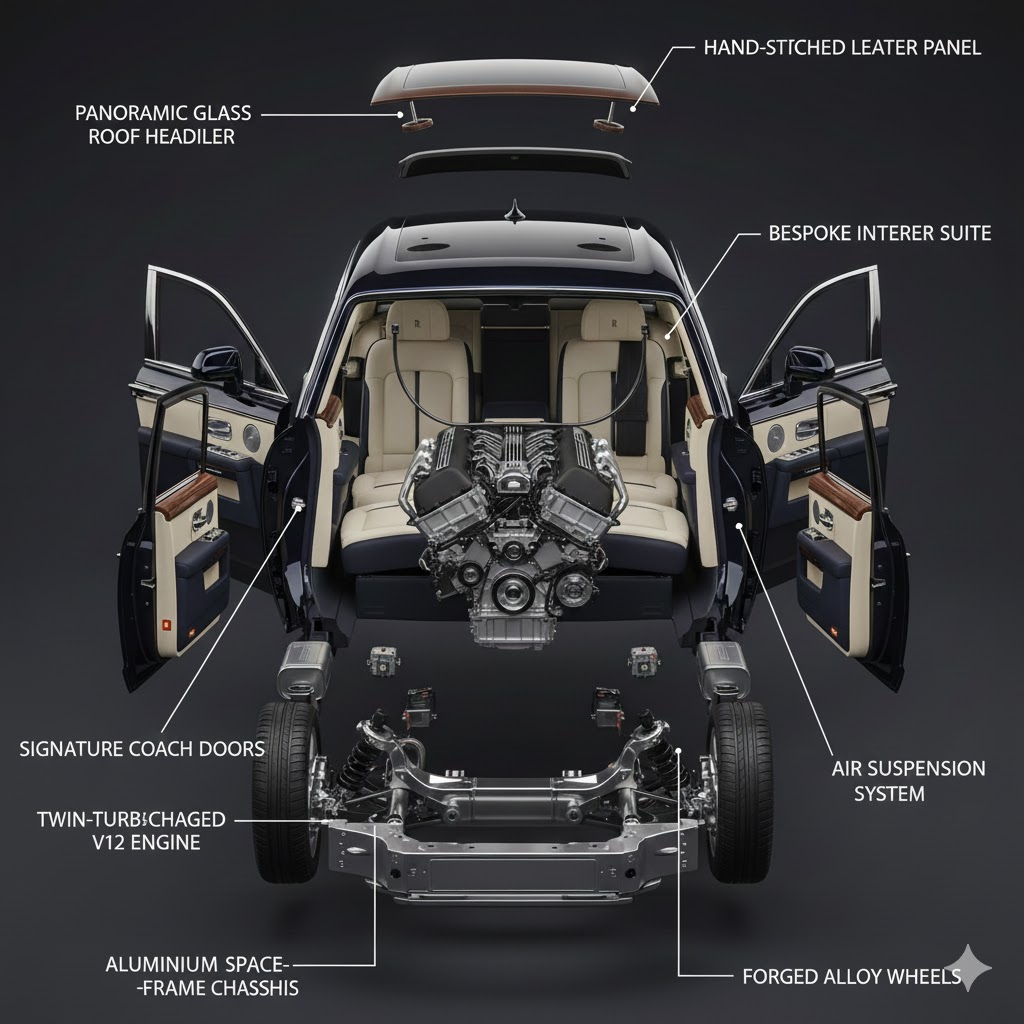
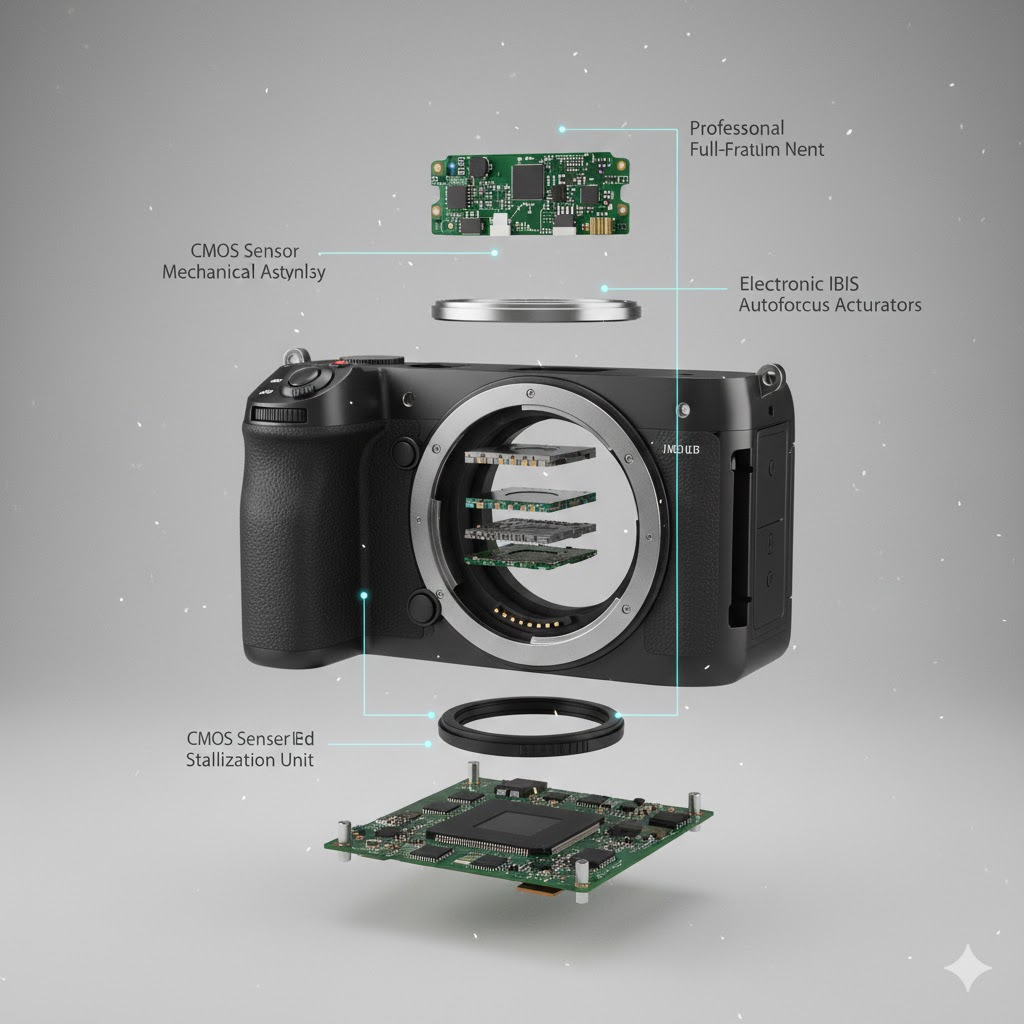
“Ultra-detailed exploded view of [PRODUCT NAME], showing [KEY COMPONENTS] floating in mid-air with perfect vertical alignment. Each component separated along the central axis with precise spacing. Materials include [SPECIFY MATERIALS: polished metal, brushed aluminum, circuit boards, etc.]. Professional engineering aesthetic with soft cinematic lighting, studio environment, neutral background. Technical illustration style with clear structural hierarchy. Components arranged to reveal internal mechanism and assembly sequence. 8K resolution, highly realistic, engineering documentation quality.”
You can customize this template by replacing the bracketed sections with your specific product details while maintaining the structural elements that guide the AI toward professional results.
Step-by-Step Process
Creating your first exploded diagram follows a straightforward workflow. Start by preparing your input. If you have an existing product photo or 3D render, ensure it’s centered on a neutral background. Higher resolution inputs of at least 2048 pixels preserve surface fidelity. Clear, well-lit photos work best.
Next, craft your prompt using the master template. Be specific about your product, components, materials, and desired aesthetic. Include details about spacing, alignment, and lighting.
Generate the image by uploading your reference photo if available, pasting your prompt, and clicking generate. Wait approximately 30 to 45 seconds for processing.
Review and refine the output. Check component separation and clarity, verify material representation accuracy, assess lighting and overall composition, and ensure text or labels are legible if included.
If refinement is needed, adjust your prompt. Add more specific spacing instructions, modify material descriptions, change lighting direction or intensity, or request different component arrangements. Generate again and compare results.
Subscribe to our Newsletter for Free Tips and Guide
Advanced Prompting Techniques
Once you master the basics, these advanced techniques will elevate your exploded diagrams to professional standards.
For layered explosions with multiple depth levels, try: “Create a three-tier exploded view with outer casing at top level, internal frame in middle layer, and core electronics at bottom, each separated by 15cm spacing.”
To add technical annotations, use: “Include white annotation lines connecting to each major component with clean labels identifying part names, materials, and dimensions in technical font.”
For specific explosion axes, specify: “Explode components radially from center point” or “Separate parts along 45-degree diagonal axis with asymmetric spacing.”
When emphasizing particular components, request: “Highlight the circuit board layer with subtle glow effect while maintaining realistic lighting on other components.”
For color-coded assemblies, try: “Color-code component groups: blue for electronic parts, gray for structural elements, orange for fasteners.”
Industry-Specific Applications
Different industries can leverage Nano Banana’s capabilities in unique ways. Product designers use exploded views to showcase assembly processes for instruction manuals, present design concepts to stakeholders and investors, document product evolution through development stages, and create compelling visuals for crowdfunding campaigns.
Engineers benefit by generating technical documentation for patents, creating assembly guides for manufacturing teams, visualizing mechanical systems for design reviews, and producing training materials for maintenance procedures.
Marketing professionals create engaging product launch visuals, develop exploded view animations for advertisements, generate content for technical specification sheets, and build interactive web presentations showing product internals.
Educators utilize the tool to teach mechanical engineering concepts through visual aids, explain product design principles to students, create engaging STEM educational materials, and demonstrate assembly and disassembly procedures.
Optimizing for Different Product Types
Different product categories require tailored approaches for best results.
For electronics and devices, emphasize circuit boards, chips, and connectors. Specify metallic finishes and glossy surfaces. Request transparent elements to show internal circuitry. Highlight LED indicators and screens.
When visualizing mechanical assemblies, focus on gears, bearings, and linkages. Include material specifications like steel, aluminum, or brass. Show thread patterns on fasteners and bolts. Emphasize mechanical precision and tight tolerances.
For consumer products, showcase ergonomic design elements, highlight user-facing components and interfaces, include textural details like rubber grips or fabric, and balance aesthetic appeal with technical accuracy.
Architectural elements benefit from structural components and connections, material callouts for concrete, steel, and glass, emphasizing load-bearing elements and support systems, and showing assembly sequences for modular designs.
Common Challenges and Solutions
Even with advanced AI, you may encounter challenges. Here’s how to address them.
If components appear too crowded, add to your prompt: “Increase spacing between components to 20cm intervals” or “Stagger explosion with progressive distance from center.”
When alignment seems off, specify: “Maintain strict vertical alignment along central axis” or “Arrange components in perfect radial symmetry.”
For unrealistic materials, be more specific: “Brushed aluminum with visible grain texture” or “Matte black plastic with slight surface texture.”
If lighting appears harsh or flat, adjust by requesting: “Soft three-point lighting setup with subtle shadows” or “Volumetric studio lighting with gradient background.”
When text or labels are unclear, try: “Reserve header area for clean text placement” or “Generate diagram without embedded text for manual annotation.”
Combining with Traditional Tools
Nano Banana works best as part of a complete workflow. After generating your base exploded diagram, you can import into Figma or Adobe Illustrator for precise label placement and typography. Add technical dimensions, callouts, and specification text. Create multi-page documentation with consistent styling. Export in various formats for print and digital use.
Use Photoshop or similar tools for final touch-ups. Adjust colors and contrast for brand consistency. Add subtle shadows or highlights for depth. Composite multiple generated variations. Prepare files for specific output requirements.
Integrate with CAD workflows by using Nano Banana diagrams as concept visualization before detailed CAD modeling. Creating presentation materials alongside technical drawings. Generating quick mockups for client reviews. Producing marketing assets from engineering models.
Best Practices for Professional Results
To consistently achieve professional-quality results, follow these guidelines.
Start with quality inputs. Use high-resolution reference images when available, ensure products are well-lit and centered, remove distracting backgrounds before upload, and capture multiple angles for complex products.
Be iterative in your approach. Generate multiple variations with slight prompt adjustments, compare results and identify successful elements, combine the best aspects from different attempts, and save successful prompts for future projects.
Maintain consistency across series. Use the same prompt structure for product families, specify consistent lighting and material descriptions, maintain uniform spacing and alignment rules, and create a style guide for recurring projects.
Optimize for your output medium. Request appropriate aspect ratios for your use case, specify resolution based on print versus digital needs, consider color space requirements for professional printing, and test output at final size before committing.
Troubleshooting Guide
When results don’t meet expectations, systematic troubleshooting helps. If the AI misinterprets your product, provide a clearer reference image, simplify your product description, break complex products into simpler components, or use more common terminology.
When component separation is inadequate, explicitly request “floating components with visible air gaps,” increase spacing specifications in your prompt, specify “explode along [axis] with [distance] separation,” or ask for “dramatic perspective to emphasize depth.”
For style inconsistencies, lock in successful aesthetic elements by referencing them explicitly, use comparative language like “similar to technical manual illustrations,” specify “consistent lighting across all components,” or request “uniform material rendering throughout.”
If generation takes too long or fails, simplify complex prompts into shorter instructions, reduce the number of components in a single generation, lower resolution temporarily for testing, or try generating at off-peak hours.
Prompt Library: Ready-to-Use Examples
Here are proven prompts for common scenarios you can adapt immediately.
For a smartphone exploded view: “Ultra-detailed exploded view of a modern smartphone showing screen assembly, circuit board, battery, camera modules, and aluminum frame floating in perfect vertical alignment. Each component separated with 8cm spacing. Materials include glossy glass screen, matte circuit board with visible chips, lithium battery pack, multi-lens camera array, and brushed aluminum chassis. Professional engineering aesthetic with soft studio lighting, white background. 8K resolution, technical illustration style.”
For a mechanical watch: “Engineering exploded view of luxury mechanical watch movement with gears, springs, jewels, and escapement mechanism arranged radially from center. Polished steel components with visible fine engravings, ruby jewel bearings, gold balance wheel. Components floating with precise circular spacing pattern. Dramatic side lighting highlighting metal surfaces. Black gradient background. Ultra-high detail, 8K resolution, horological technical drawing style.”
For power tool assembly: “Detailed exploded view of cordless power drill showing motor assembly, gear train, chuck mechanism, battery pack, and housing components along vertical axis. Components include copper motor coils, steel gears, plastic housing in industrial yellow and black, lithium battery cells. Clear 10cm spacing between major assemblies. Technical lighting emphasizing mechanical precision. Neutral gray background. Engineering documentation quality, 4K resolution.”
Advanced Features in Nano Banana Pro
The recently launched Nano Banana Pro (Gemini 3 Pro Image) offers enhanced capabilities for even more sophisticated exploded diagrams. You can now blend up to fourteen input images while maintaining consistency, create diagrams at true 4K resolution for print-quality output, leverage improved text rendering for integrated labels and callouts, use advanced localized editing to refine specific components, and access real-time Google Search integration for accurate technical details.
These professional-grade features make Nano Banana Pro ideal for enterprise documentation, high-fidelity marketing materials, technical publication illustrations, and patent application drawings.
Integration with Documentation Workflows
To maximize efficiency, integrate Nano Banana into your existing processes. For product manuals, generate exploded views for assembly instructions, create maintenance and repair guides, produce troubleshooting visual aids, and develop spare parts catalogs with visual references.
In technical presentations, include diagrams in pitch decks and proposals, enhance technical review presentations, create visual aids for training sessions, and develop compelling investor presentations.
For web and digital content, embed interactive diagrams on product pages, create animated assembly sequences from multiple views, develop AR experiences showing product internals, and build engaging social media content.
In compliance and regulatory documentation, produce detailed patent application illustrations, create safety documentation and warnings, develop regulatory submission materials, and generate quality control visual standards.
Tips for Consistent Branding
When using Nano Banana for commercial purposes, maintain brand consistency by specifying brand colors using hex codes in prompts, requesting materials that align with brand aesthetic, maintaining consistent lighting style across all diagrams, and using the same prompt structure for product families.
Create a brand style guide that includes approved prompt templates for your products, lighting and material specifications, spacing and alignment standards, resolution and aspect ratio requirements, and color palette hex codes.
Test outputs against brand standards before finalizing, ensure consistency across different product categories, document successful prompts in a shared library, and train team members on brand-specific prompt patterns.
Cost Considerations
Understanding the economics helps with planning. Free options through Google AI Studio and Gemini app are suitable for individual creators, small projects, and experimentation. They come with reasonable usage limits for most needs.
The API pricing model charges approximately $0.039 per image with volume discounts for large projects. This is cost-effective compared to hiring technical illustrators and significantly cheaper than CAD software licenses.
When calculating ROI, consider time savings versus traditional CAD workflows, reduced need for specialized technical illustrators, faster iteration and client approval cycles, and scalability for large product catalogs.
Future Developments and Trends
The field of AI-generated technical illustration continues evolving rapidly. Emerging capabilities include enhanced material physics simulation, improved understanding of mechanical relationships, better automatic annotation and labeling, integration with 3D CAD file formats, and real-time collaborative editing features.
Stay current by following Google’s AI blog for model updates, joining communities sharing prompt techniques, experimenting with new features as they’re released, and providing feedback to help shape development priorities.
Conclusion
Nano Banana represents a fundamental shift in how we create technical documentation and product visualization. By combining natural language prompting with sophisticated AI image generation, it democratizes access to professional-grade exploded diagrams that previously required expensive software and specialized skills.
Whether you’re an engineer documenting a new invention, a product designer pitching to investors, a marketer creating compelling visuals, or an educator explaining complex mechanisms, Nano Banana empowers you to create accurate, engineering-style exploded diagrams in seconds rather than hours.
The key to success lies in understanding prompt structure, iterating based on results, and integrating the tool into broader workflows. Start with the templates provided in this guide, experiment with variations for your specific products, and gradually develop your own prompt library optimized for your needs.
The barrier between concept and visualization has never been lower. With Nano Banana, anyone can now create the kind of technical illustrations that once required years of CAD training and expensive software. The future of technical communication is here, and it speaks your language.
Frequently Asked Questions
What file formats does Nano Banana support for input? Nano Banana accepts JPEG, PNG, and WebP formats up to 5MB for optimal quality.
How long does it take to generate an exploded diagram? Most diagrams generate in 30 to 45 seconds, depending on complexity and server load.
Can I use Nano Banana diagrams commercially? Yes, images generated through Gemini models can be used commercially, but review Google’s current terms of service for specific use cases.
What resolution should I request for print materials? Request 8K resolution for large format prints, 4K for standard print materials, and 2K for digital use.
How do I add text labels to my diagrams? Either include label requests in your initial prompt or generate the diagram without text and add labels in design software afterward.
Can Nano Banana work with CAD files directly? Currently, you’ll need to export rendered images from CAD software to use as input for Nano Banana.
What’s the difference between Nano Banana and Nano Banana Pro? Pro offers higher resolution (up to 4K native), better text rendering, more input image fusion (up to 14 images), and enhanced creative controls.
Are there usage limits on the free tier? Google AI Studio has reasonable usage limits suitable for most projects, though exact limits may vary and aren’t publicly specified.
How can I achieve more consistent results? Save successful prompts, use them as templates, specify exact spacing and alignment measurements, and reference previously generated images as style guides.
What industries benefit most from AI-generated exploded diagrams? Consumer electronics, mechanical engineering, product design, education, technical documentation, and marketing all see significant benefits from AI-generated exploded views.
Last updated: December 2025. As AI technology evolves rapidly, check Google’s official documentation for the latest features and capabilities.