Google’s Nano Banana has changed how people create and edit images with AI.
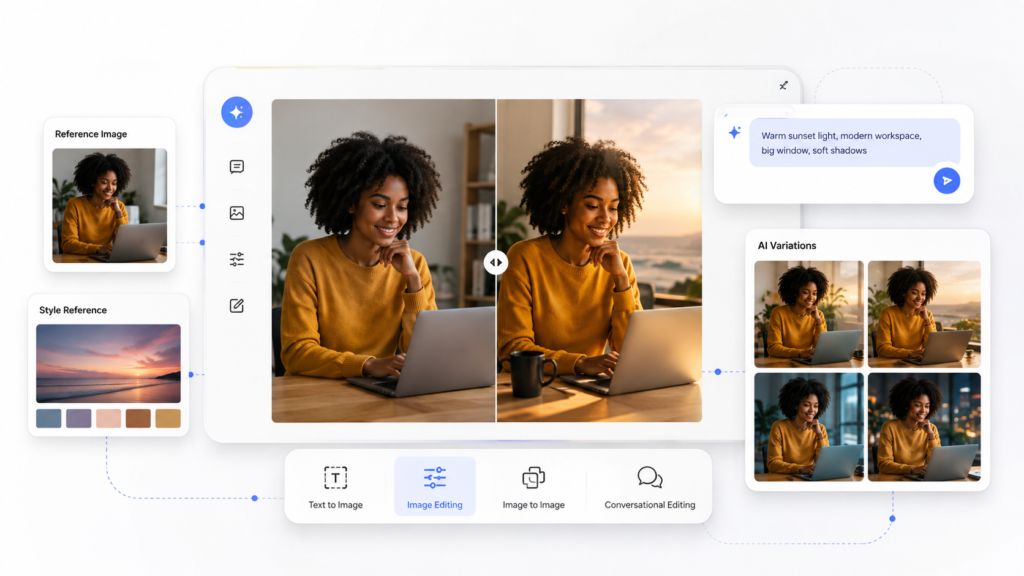
Instead of learning complicated design software, you can describe what you want in natural language, upload an existing image, and ask Gemini to transform it.
The technology has also evolved quickly. Google now offers a Nano Banana family that includes Nano Banana 2 for fast, general-purpose image generation and editing, Nano Banana 2 Lite for efficiency, and Nano Banana Pro for more advanced professional workflows.
This guide explains how Nano Banana works, how to write better prompts, how to edit images without destroying the original composition, and how businesses, creators, marketers, educators, and developers can use it.
Read Also: How to Build a SaaS Business With AI in 2026: Complete Step-by-Step Guide
What Is Google Nano Banana?
Nano Banana is Google’s name for its Gemini-powered image generation and editing technology.
It can generate images from text prompts and modify existing images using natural-language instructions.
The important difference is that you can treat image creation as a conversation.
For example, instead of starting over every time you want to change an image, you can ask Gemini to:
“Change the background to a modern office.”
Then:
“Keep the person exactly the same, but change the jacket to navy blue.”
Then:
“Make the lighting warmer and add soft window light.”
Google specifically highlights Nano Banana’s ability to understand text and images together and make precise edits while preserving other parts of a scene.
Nano Banana vs Nano Banana Pro vs Nano Banana 2
The Nano Banana name now covers several generations and model variants.
Nano Banana, also known as Gemini 2.5 Flash Image, focuses on fast image generation and editing.
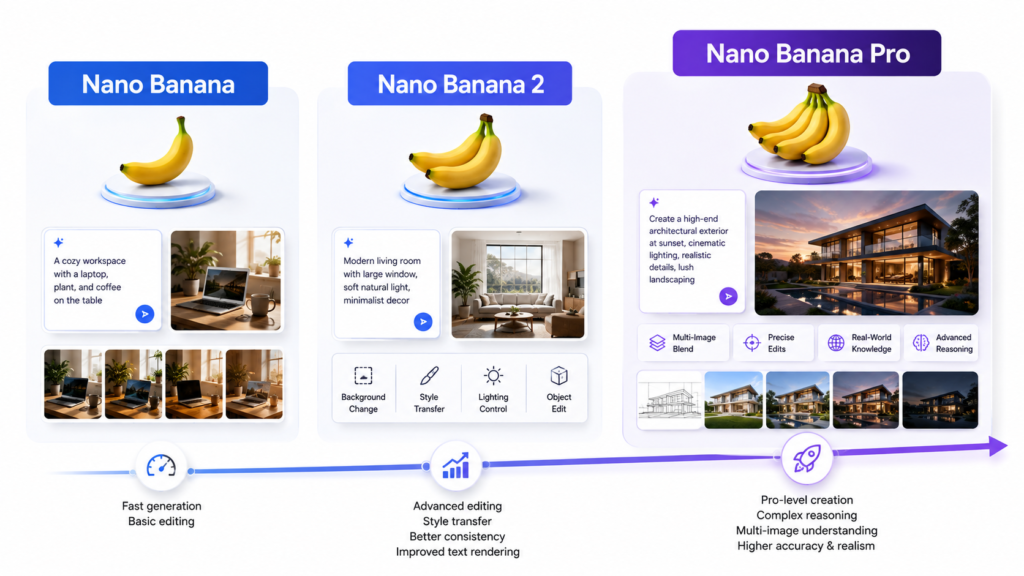
Nano Banana Pro, powered by Gemini 3 Pro Image, is designed for more complex professional work. Google highlights stronger reasoning, improved text rendering, image blending, and access to Google Search for grounded visual creation.
Nano Banana 2, powered by Gemini 3.1 Flash Image, is Google’s newer general-purpose image generation model. Google describes it as the recommended all-around option when balancing quality, intelligence, cost, and speed. Nano Banana 2 Lite focuses on lower latency and cost.
A simple way to think about them is:
Nano Banana: Fast image generation and editing.
Nano Banana 2: Strong everyday image generation and editing.
Nano Banana 2 Lite: Efficiency and speed.
Nano Banana Pro: Complex, professional-grade visual work.
How to Access Nano Banana
For most people, the easiest route is Gemini.
Google’s current instructions say to open Gemini, select “Create images” from the tools menu, choose the appropriate model, and enter your prompt. You can also upload an image when you want to edit an existing visual.
Developers can access Nano Banana models through the Gemini API and Google’s AI development platforms. Google currently recommends Nano Banana 2 as its general-purpose image generation model, while Nano Banana Pro is positioned for more demanding professional production.
The Nano Banana Prompt Formula
One of the biggest mistakes people make with AI image generation is writing prompts that are too vague.
Google recommends starting with a simple structure:
Create an image of + subject + action + scene.
For example:
“Create an image of a Nigerian entrepreneur working on a laptop in a modern Lagos office.”
You can then add more information.
A stronger prompt might be:
“Create a photorealistic editorial photograph of a Nigerian entrepreneur working on a laptop in a modern Lagos office. Medium shot. Natural window lighting. Clean contemporary workspace. Subtle depth of field. Professional business magazine photography.”
The key principle is simple:
Tell Nano Banana what you want to see, not just what you want it to feel like.
The 7-Part Nano Banana Prompt Framework
For more control, build prompts around seven elements.
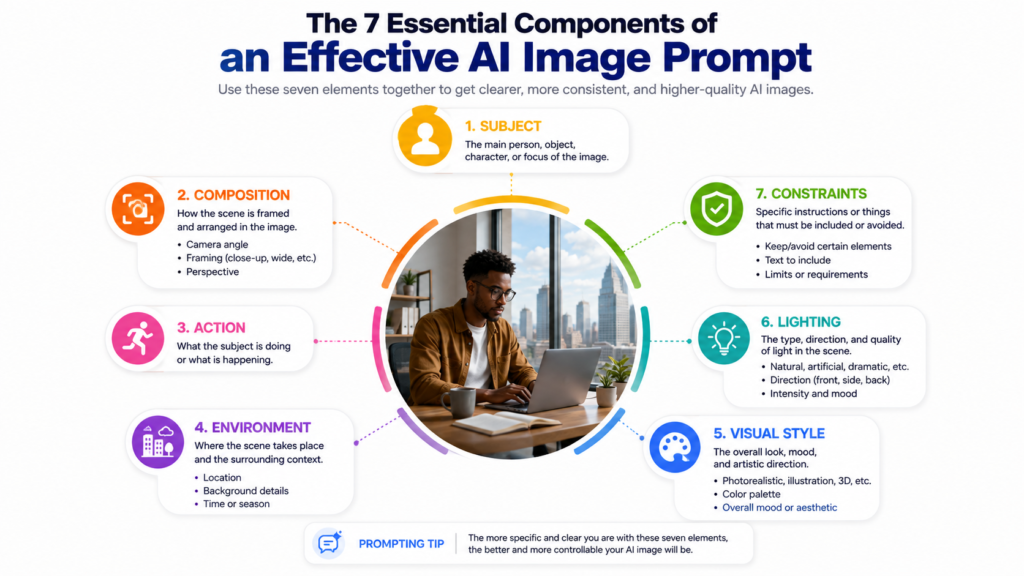
1. Subject
Describe the main person, object, product, or character.
Weak:
“A businessman.”
Better:
“A young Nigerian entrepreneur in a tailored charcoal suit, seated at a modern desk.”
2. Composition
Tell the model how the image should be framed.
Examples:
“Close-up portrait.”
“Wide establishing shot.”
“Low-angle perspective.”
“Over-the-shoulder composition.”
“Centered product photograph.”
Google recommends specifying composition when you need more control over the final result.
3. Action
Describe what is happening.
Examples:
“Typing on a laptop.”
“Walking through a busy marketplace.”
“Presenting a product to a small audience.”
“Examining a prototype.”
4. Environment
Describe where the scene happens.
Examples:
“Modern Lagos startup office.”
“Busy Nigerian marketplace.”
“Minimalist photography studio.”
“Futuristic classroom.”
5. Visual Style
Specify the visual direction.
Examples:
“Photorealistic editorial photography.”
“Luxury product photography.”
“Documentary photography.”
“Minimalist 3D illustration.”
“Vintage film photography.”
6. Lighting
Lighting can dramatically change the result.
Examples:
“Soft natural window light.”
“Golden-hour lighting.”
“High-key studio lighting.”
“Dramatic cinematic lighting.”
“Soft diffused lighting.”
7. Constraints and Editing Instructions
Tell Nano Banana what must remain unchanged.
For example:
“Keep the person’s facial features, hairstyle, clothing, pose, and body proportions unchanged. Only replace the background.”
This is particularly useful when editing an existing photograph.
The Most Powerful Nano Banana Feature: Conversational Editing
Nano Banana becomes particularly useful when you stop treating every generation as a one-shot prompt.
Generate a starting image.
Then refine it.
For example:
Prompt 1:
“Create a professional LinkedIn profile photograph of a technology entrepreneur in a modern office.”

Prompt 2:
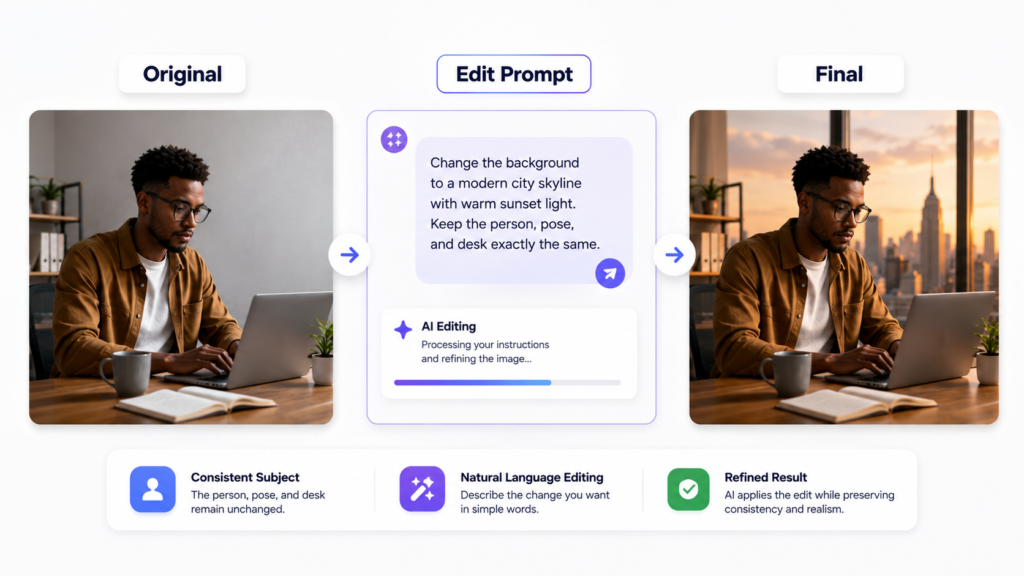
“Keep the person and composition unchanged. Replace the background with a bright modern workspace.”

Prompt 3:
“Keep everything else unchanged. Make the lighting softer and more natural.”

Prompt 4:
“Keep the subject unchanged. Add subtle depth of field to the background.”

This workflow gives you much more control than trying to describe everything perfectly in one enormous prompt.
Google’s own Nano Banana guidance recommends direct, specific editing instructions when modifying existing images.
Read Also: Best AI Tools for LinkedIn Marketing in 2026: 10 Tools to Grow Your Brand
How to Preserve Character Consistency
Character consistency matters when creating:
Social media campaigns.
Comics.
Storyboards.
Brand characters.
Marketing campaigns.
Educational content.
Product demonstrations.
The important instruction is to clearly identify what should remain unchanged.
Try:
“Use the uploaded image as the primary character reference. Preserve the person’s facial identity, hairstyle, clothing style, proportions, and recognizable features. Change only the environment.”

Then make one change at a time.
Instead of asking for five major transformations simultaneously, use a sequence of smaller edits.
How to Edit One Element Without Changing Everything
This is one of the most useful Nano Banana techniques.
Suppose you have a product photograph and only want to change the background.
Instead of:
“Create a new product photo with a different background.”
Try:
“Edit the uploaded image. Keep the product, camera angle, proportions, lighting on the product, and composition unchanged. Replace only the background with a clean white studio environment.”
The second prompt communicates that the original image is the source of truth.
This approach is useful for product photography, personal branding, advertising creatives, and social media graphics.
How to Add Text to Images
AI-generated text has historically been a major weakness in image generation.
Newer Nano Banana models have improved considerably.
Google specifically highlights Nano Banana Pro’s ability to generate more accurate and legible text, including multilingual text.
For better results, specify:
The exact words.
The location.
The hierarchy.
The typography style.
The approximate size.
The relationship between text and image.
For example:
“Create a clean technology conference poster. Place the exact headline ‘AI FOR BUSINESS’ at the top in large bold white typography. Add the subtitle ‘Practical AI strategies for modern teams’ below it in smaller text. Keep all text fully visible and correctly spelled.”
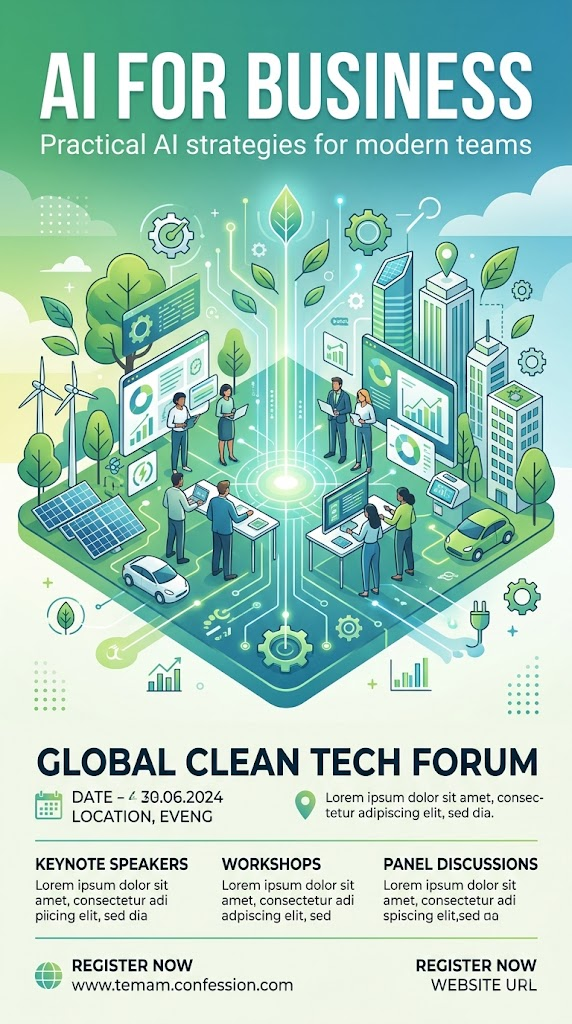
Always check generated text manually before publishing.
How to Create Social Media Graphics
Nano Banana can help create visuals for:
LinkedIn posts.
X posts.
Instagram content.
YouTube thumbnails.
Blog graphics.
Newsletter illustrations.
Presentation slides.
Ad concepts.
A useful workflow is:
- Define the message.
- Choose the image format.
- Describe the subject.
- Specify the composition.
- Add brand elements.
- Generate the first version.
- Make targeted edits.
- Verify every word.
- Export and resize for the destination platform.
For example:
“Create a clean 16:9 technology editorial graphic about AI agents transforming customer service. Use a modern professional visual style, strong focal point, generous negative space, and a composition suitable for a LinkedIn article thumbnail.”
How Businesses Can Use Nano Banana
Nano Banana can reduce the amount of time required to produce visual concepts.
Here are practical business applications.
Product Marketing
Create product mockups, campaign concepts, packaging ideas, and promotional visuals.
Personal Branding
Create professional profile images, editorial portraits, social media graphics, and campaign assets.
E-commerce
Create product backgrounds, lifestyle concepts, seasonal campaigns, and promotional imagery.
Content Marketing
Turn written concepts into diagrams, illustrations, infographics, and editorial visuals.
Education
Create visual explanations, historical scenes, diagrams, classroom materials, and learning aids.
Presentations
Create custom visuals for presentations instead of relying entirely on stock imagery.
Advertising
Generate creative concepts before committing resources to photography or full production.
Nano Banana for Content Creators
Creators can use Nano Banana to build repeatable visual systems.
For example, a creator could establish a consistent visual identity:
“Create all future images using a clean editorial technology aesthetic, neutral backgrounds, realistic photography, subtle depth of field, and strong visual hierarchy.”
Then use the same direction across multiple images.
The goal is consistency, not simply generating one impressive image.
Nano Banana for Bloggers and SEO
Visual content can strengthen an article, but images should support the search intent.
For an article about AI agents, for example, create:
A featured image.
A workflow diagram.
A comparison graphic.
A use-case illustration.
A process visualization.
A summary graphic.
Do not create five decorative images just to increase the image count.
Each visual should answer a question or make a concept easier to understand.
A Better Nano Banana Workflow for SEO Content
Use this process:
Research the topic.
Identify the reader’s questions.
Create the article.
Identify concepts that need visual explanation.
Generate supporting visuals.
Add descriptive filenames.
Write useful alt text.
Compress images before publishing.
Use appropriate dimensions.
Place images close to the section they explain.
This creates a stronger user experience than adding random AI images throughout an article.
20 Nano Banana Prompt Templates
1. Professional Portrait
“Create a photorealistic professional portrait of [subject]. Use [lighting]. Frame the image as a [composition]. Background: [environment]. Visual style: [style].”
2. Product Photography
“Create a premium product photograph of [product]. Place it on [surface]. Use [lighting]. Camera angle: [angle]. Background: [background]. Make the product the primary focal point.”
3. LinkedIn Graphic
“Create a professional 16:9 LinkedIn graphic explaining [topic]. Main visual: [subject]. Include the exact headline [text]. Use a clean editorial technology aesthetic with strong visual hierarchy.”
4. YouTube Thumbnail
“Create a high-impact 16:9 YouTube thumbnail about [topic]. Use one dominant visual subject, strong contrast, clear composition, and minimal readable text. Exact headline: [text].”
5. Infographic
“Create a clear educational infographic explaining [topic]. Organize the information into [number] sections. Use simple visual hierarchy and clearly readable labels.”
6. Product Mockup
“Place [product] inside a premium [environment] while preserving its original proportions, branding, colors, and design.”
7. Background Replacement
“Keep the subject completely unchanged. Replace only the background with [background]. Match the lighting and perspective naturally.”
8. Photo Restoration
“Restore the uploaded photograph while preserving the person’s recognizable features and original composition. Improve clarity and remove visible damage without changing the historical character of the photograph.”
9. Fashion Concept
“Create an editorial fashion photograph featuring [subject] wearing [clothing]. Location: [location]. Lighting: [lighting]. Composition: [composition].”
10. Business Illustration
“Create a professional conceptual illustration explaining [business concept]. Use [visual metaphor or objects] and a clean corporate editorial style.”
11. App Concept
“Create a realistic presentation mockup showing [app] on [device]. Use a clean modern interface and a professional product-design presentation style.”
12. Educational Diagram
“Create a clear educational diagram explaining [process]. Show the stages from [start] to [end]. Use readable labels and logical visual flow.”
13. Historical Scene
“Create a historically grounded scene showing [event]. Focus on accurate clothing, architecture, environment, and objects appropriate to [period/location].”
14. Restaurant Marketing
“Create a premium food photography image of [dish]. Place it on [table/environment]. Use [lighting] and a [camera style] composition.”
15. Real Estate
“Create a realistic architectural marketing photograph of [property]. Show [specific features]. Use natural lighting and professional real-estate photography composition.”
16. Before and After
“Create a clean before-and-after comparison showing [subject]. Keep the framing consistent between both sides. Clearly label the two states.”
17. Brand Campaign
“Create a consistent brand campaign image for [brand]. Maintain [brand colors], [visual style], and [brand identity]. Main subject: [subject].”
18. Storyboard
“Create a storyboard sequence showing [story]. Include [number] distinct scenes with consistent characters, locations, and visual style.”
19. Social Media Carousel
“Create a visual sequence explaining [topic] across [number] panels. Maintain consistent typography, composition, and visual identity.”
20. Photo Editing
“Edit the uploaded image. Preserve [elements]. Change only [specific element]. Match the original lighting, perspective, shadows, and image quality.”
The Secret to Better Results: Edit Instead of Restarting
A common mistake is deleting an image every time something looks wrong.
You often get better results by making incremental edits.
For example:
First generate the scene.
Then adjust the lighting.
Then change the background.
Then correct the clothing.
Then improve the composition.
Then fix the text.
This creates a visual iteration loop.
Generate → inspect → identify one problem → edit → inspect again.
Common Nano Banana Prompting Mistakes
Being Too Vague
“Make a cool image.”
This gives the model too much freedom.
Changing Too Many Things at Once
If you need precise editing, isolate the change.
Forgetting Composition
If you don’t specify framing, the model chooses it for you.
Ignoring Text
If the image contains important words, explicitly provide the exact text.
Not Providing Reference Images
When visual consistency matters, upload the relevant reference image.
Expecting Pixel-Perfect Editing
Generative image editors can still introduce unintended changes. Research has identified problems such as spatial misalignment, texture distortion, and hallucinated visual content in AI image editing.
Always inspect important outputs.
Nano Banana for Developers
Nano Banana isn’t limited to the Gemini consumer app.
Google provides image-generation capabilities through its developer ecosystem.
The Gemini API documentation currently identifies:
Gemini 3.1 Flash Image, Nano Banana 2.
Gemini 3.1 Flash Lite Image, Nano Banana 2 Lite.
Gemini 3 Pro Image, Nano Banana Pro.
Gemini 2.5 Flash Image, Nano Banana.
Google recommends Nano Banana 2 as the general-purpose choice and Nano Banana Pro for more complex professional image-generation tasks.
This opens the door to applications such as:
AI design assistants.
Marketing platforms.
Product visualization tools.
Automated content systems.
Educational applications.
Creative workflows.
Custom image-generation interfaces.
Nano Banana and AI Search
One of the more interesting developments is the connection between image generation and factual information.
Google says Nano Banana Pro can use real-world knowledge and Google Search grounding for certain visual-generation workflows.
That matters for visuals such as:
Educational infographics.
Data explanations.
Geographic information.
Scientific concepts.
Current-event explainers.
However, generated visuals should still be fact-checked before publication.
A beautiful infographic can still contain incorrect information.
Important Limitations
Nano Banana is powerful, but it isn’t perfect.
You should watch for:
Incorrect text.
Incorrect facts.
Unexpected changes to people or objects.
Anatomical inconsistencies.
Incorrect logos or branding.
Altered product details.
Visual artifacts.
Unintended changes during editing.
For important professional work, treat AI output as a draft that requires review.
Google itself notes that generated content can be experimental and advises users to consider accuracy, copyright, privacy, and the terms governing Gemini-generated content.
Copyright and Privacy
Do not upload sensitive images simply because an AI tool can edit them.
Be especially careful with:
Private documents.
Personal identification documents.
Confidential business information.
Private photographs of other people.
Copyrighted assets you do not have permission to use.
Google’s Gemini guidance explicitly reminds users to respect copyright and privacy rights when using generated and edited images.
A Practical Nano Banana Workflow for Professionals
Here is a workflow you can use immediately.
Step 1: Define the objective.
What should the image accomplish?
Step 2: Define the audience.
Who will see it?
Step 3: Define the subject.
What should people notice first?
Step 4: Define the composition.
How should the viewer see it?
Step 5: Define the visual style.
Photorealistic? Editorial? Illustration? 3D?
Step 6: Generate the first version.
Do not try to make it perfect immediately.
Step 7: Inspect the output.
Find the biggest problem.
Step 8: Make one targeted edit.
Avoid rewriting everything.
Step 9: Verify text and facts.
Especially for business and educational content.
Step 10: Optimize the final asset.
Resize, compress, rename, and add useful alt text before publishing.
The Nano Banana Prompt Cheat Sheet
For quick reference:
Subject = What?
Action = Doing what?
Environment = Where?
Composition = How framed?
Style = What visual direction?
Lighting = What illumination?
Color = What palette?
Text = What exact words?
Constraints = What must remain unchanged?
Reference = What image should guide the result?
The more important the image, the more useful these constraints become.
Frequently Asked Questions
What is Nano Banana?
Nano Banana is Google’s Gemini-powered image generation and editing technology. It can create images from prompts and edit uploaded images using natural-language instructions.
Is Nano Banana free?
Image generation availability and usage limits depend on the Gemini product, account, model, country, and plan. Google provides image generation in Gemini, with additional capabilities available to certain paid subscribers.
What is Nano Banana 2?
Nano Banana 2 is Google’s newer general-purpose image generation and editing model, powered by Gemini 3.1 Flash Image. Google positions it as the general-purpose choice for balancing capability, cost, and speed.
What is Nano Banana Pro?
Nano Banana Pro is powered by Gemini 3 Pro Image. It is designed for more complex visual work and offers advanced capabilities such as improved text rendering, image blending, reasoning, and grounded visual generation.
Can Nano Banana edit existing photos?
Yes. Gemini supports uploading images and using natural-language instructions to edit them.
Can Nano Banana create images with text?
Yes. Newer models have significantly improved text rendering. Nano Banana Pro is specifically designed to produce more accurate and legible text inside images.
Can Nano Banana create professional marketing images?
Yes. It can generate product concepts, campaign visuals, social media graphics, editorial images, and other marketing assets. However, important commercial assets should be reviewed before publication.
Is Nano Banana better than traditional graphic design?
They solve different problems.
Nano Banana is excellent for rapidly generating and modifying visual concepts.
Traditional design software remains useful when you need precise layout control, exact brand specifications, pixel-level editing, or production-ready files.
The strongest workflow often combines both.
Final Takeaway
The biggest Nano Banana advantage isn’t simply that it can generate impressive images.
It is the ability to communicate visually through natural language and iterate quickly.
The most effective users don’t rely on one giant “magic prompt.”
They give the model a clear objective, define the visual structure, generate a first version, inspect the result, and make targeted edits.
The practical formula is:
Clear objective + specific prompt + reference image + controlled editing + human review = better AI visuals.
Nano Banana is becoming a serious visual-production tool for creators, marketers, businesses, educators, and developers.
The skill worth learning is therefore not simply “how to generate an AI image.”
It is how to direct, edit, evaluate, and deploy AI-generated visuals effectively.
That is the real Nano Banana playbook.
Olasunkanmi Adeniyi is a solo founder, product builder, no-code and low-code developer, and SEO/content strategist. He builds websites, SaaS products, digital tools, and content systems using AI and modern development tools.
His work focuses on practical AI implementation rather than theory. He experiments with AI-powered workflows, product development, automation, SEO, and online business, documenting the lessons, tools, and processes that help founders and creators build and launch faster.
Through his blog, www.aidiscoveries.io Olasunkanmi Adeniyi shares practical guides on AI tools, SaaS development, no-code and low-code building, SEO, content strategy, and online business.



Leave a Reply